Tag Archives: ssb

Using the Icom M803 with Sailmail

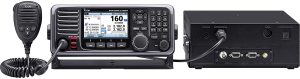
Icom’s new M803 Marine SSB Radio began shipping in early 2020 and is a terrific radio for use with Sailmail. It supports the latest DSC standard, incorporates Icom’s latest SDR radio designs, and also includes GPS (internal or external) and provides that data for position reporting. Any of the SCS modems are supported.

Connection is similar to Icom’s previous marine radios, with audio and control cables commecting radio to modem: One for the audio signals and a second cable for radio frequency control. While the M803 has the same “ACC” connector as the earlier M802 and M710/700pro radios, it is not compatible and a different cable is needed for the AF/MOD connector. Here are the details:

Modems: Any of the SCS Pactor modems including the DR-7400 or DR-7800 Pactor-4 modems, the PTC-IIIusb Pactor-2 modem, and any of the earlier PTC-II modem-series.

Cables: The audio cable is Farallon #9098 (2M, or 9099 for 4M). This is a new cable for the M803 (details below). Connect this from the modem’s “Audio” (“Main Audio” for the DR-7800) to the radio’s “AF/MOD” connector and plug the 8-pin DIN plug into the radio’s “ACC” connector (for 12V power).  The 9090 cable used on most Icom radios for the “ACC” connector cannot be used. The audio level settings should be 900/1200 for FSK/PSK respectively. Airmail’s “autoset” function has been updated and works well for the M803.

Frequency Control: The radio’s “REMOTE” frequency-control connection is via a standard RS232 serial port and can be connected to the modem with a Farallon #8083 cable (2M, or 8084 for 4M). Connect this from the modems “Control” connector to the radio’s “REMOTE” connector. Alternately use a standard serial cable from a computer serial port (or USB/serial adapter) to the radio’s REMOTE port (9-pin male-female). The M803’s Remote-ID is 20, and the baud rate is 4800 (avoid the higher rates).

Ferrites: It is important (with any radio installation!) that ferrite chokes be installed at each end of both cables from the modem to radio, and also at both ends of the USB cable from computer to modem (does not apply with a bluetooth connection). The ferrites should be located near each end, use a small cable-tie to prevent them from sliding down the cable. It is also a good idea to add a cable-tie around the ferrite itself to make sure it stays closed. The recommended ferrites are Type-31 material from Fair-Rite.

Modem setup: The only setup required is for a PTC-IIIusb/DR-7400/DR-7800, if you want it to power-on with the radio (and of course you do): Set Dip Switch #1 on the back of the modem to the DOWN position to power on automatically when the radio is powered on. 

Radio settings: Check the following settings in the radio’s setup menu. To change a setting press the radio’s MENU button , then use the arrows or the big knob select the setting and press the “enter” (ENT) key, then repeat for each sub-menu:

  • MENU > Configuration > Remote > Interface: Select RS-232C. Leave baud rate set to 4800 bps. Verify that MOD is set to AF/MOD.
  • MENU > Configuration > GPS > Internal GPS: Verify GPS, GLONASS and SBAS are set to On if using the external GPS antenna (see below).  
  • MENU > Configuration > GPS > External GPS: If an external GPS is connected via the BNC connector then verify the baud rate: 4800 for most connected GPS receivers, 38400 for a connected AIS receiver.
  • MENU > Radio Settings > Auto Tune: Select ON (assuming the AT-140 Icom auto-tuner is used). 

Other notes: The M803 has a Noise Reduction feature (under Radio Settings menu), it is recommended to leave this off for radio email– the modem has its own digital signal processing. Similarly leave the NB Level (noise-blanker) setting at minimum, and leave the RF-Gain setting set to max (9). Also use high TX-power mode (soft-key menu)– reducing transmit power will slow the connection.

Position Reporting: The M803 needs to be connected to a GPS in order for the DSC distress function to work– either using the radio’s internal GPS with a connected antenna, or (same as the M802) via the GPS-Data BNC connector from an external GPS. Where the M802 kept this data to itself, the M803 transmits the GPS data (from either source) via the REMOTE connector to the computer where Airmail (ver 3.5.054 or later) will pick it up.

What this means is that once GPS is connected to the radio for DSC, Airmail can update your lat-lon whenever Terminal window is opened, and Position Reports are updated automatically. Multiple formats are available including MarineTraffic to continue your AIS track offshore, CruisersCafe for Yotreps-style updates, and Sailblogs for a comprehensive tracking/blogging site.


Glossary of SCS Pactor Modem model numbers

SCS model numbers and pactor modes are confusing.   Current modems in production are the PTC-IIIusb and the P4dragon, and are recommended.    Any previous PTC-II, IIe, IIex,  IIpro, or IIusb modem can be licensed to use the Pactor-III  protocol for a fee (paid to an SCS dealer or to SCS, not to SailMail) but can’t be used for P4.   Pactor-III transfers data 3-4x faster than Pactor-II with good signals, and is slightly faster than Pactor-II even with weak signals. P4 is somewhat faster still, particularly with strong signals.  We strongly encourage all members to use at least Pactor-III.  SailMail’s stations are all capable of all modes including Pactor-4.  We expect that PTC-II-family modems (licensed to use Pactor-III) will continue to be used by most SailMail members because of the significantly lower cost. But for those with greater communications needs, Pactor-4 offers a way to increase capacity.  Pactor-III mode was developed after the PTC-II and PTC-IIe were introduced, and was an “option”– part of the newer firmware-updates but had to be “unlocked” with a purchased license-code.  For later modems this Pactor-III license-code was keyed to the modem’s electronic serial# (ESN) and was transferable with the modem. For earlier modems, all PTC-II’s and early production PTC-IIe units, without an ESN, the original policy was for SCS to issue a license code that was keyed to the user’s callsign. This license-codes are not transferable to a new owner and are no longer available.  If you have a PTC-II or early PTC-IIe that does not have an ESN (i.e. no barcode sticker on the bottom), it may be possible to have the modem retrofit with a hardware ESN.  contact Gary at Farallon Electronics to find out.  If it is possible, the ESN retrofit and P3 license will cost around $350.

Leave the modem selection in AirMail set to your modem model number.  If your modem has indeed been upgraded to Pactor-III mode then Airmail will detect that, and use it. Continue reading

Troubleshooting USB problems

Most new computers do not include RS-232 serial ports, and a USB/serial adapters is the most common way to connect serial devices such as a Pactor modem or a GPS. Most USB/serial adapters are reliable but unfortunately there are enough bad ones out there to cause a lot of problems. Our current favorites are any of the adapters that use the “FTDI” chipset, for example the Sabrent  CB-FTDI or search Amazon for “FTDI RS232”. Many others also work fine, just be sure that drivers are included for whatever version of Windows you are using.

If you are having problems with a serial device connected with a USB/serial adapter, here are some troubleshooting tips.

First, try to enlist the help of whoever you purchased the adapter from. If it was a Comp-USA store or a low-budget local vendor, then you may find this approach unrewarding. File that away for next time, and keep reading…

The first step in troubleshooting any system is to simplify it as much as possible. If you have multiple devices connected, then remove all but one and focus on that. If you are connecting through a USB-hub (multiple USB ports connected to a single USB-connector on the computer) then remove that, and plug your USB/serial adaptor directly into the computer. Be methodical, take notes, and simplify the configuration to the minimum and get that working before adding other devices.

Next, open Airmail’s Options window (Tools menu) and click the connection tab. Select each com-port in turn and note the description. Find your device and make sure that it is selected. The most common problem is having the wrong COM-port number. Also make sure that the baud-rate is set correctly, some USB adaptors do not like 115200 baud but all should be happy with 57600. (PTC-IIusb modems always use 115200 baud, and Airmail’s “Getfax” fax companion will be happier at 115200 if the modem-firmware is current).

If the device is not visible in Airmail’s options window com-port list, then open Windows Device manager: Right-click on “my computer” and select properties, or open Windows control-panel and select “System”. Click the “Hardware” tab and then the “Device Manager” button. Look for yellow question-marks, this would indicate a device whose driver did not load properly. If you find one of these then you need to identify the device, get the appropriate drivers and then right-click on the device and “update drivers”. Next find “Ports”, expand that (click the little “+”) and look for your USB/serial adaptor. If found, note the com-port number. That same com-port number should appear in Airmail’s Option window (remember to re-open the options window after changing devices), if not they it did not install properly.

If still no luck then make sure you have the correct– and latest– drivers for your USB/serial adaptor. Go to the manufacturer’s website, click on “support” or “dowloads” and find the drivers page. Download the driver-files for your device, save then in a “drivers” folder and then go back to device-manager (above) and try updating the drivers.

If still no luck then you may just have a turkey, see the comments above about Keyspan single-port adaptors or Edgeport multiport boxes. Or find a dealer who can supply an adaptor that they will stand behind, and will help you with if things don’t go according to plan.

Also worth noting: Some adapters assign com-port numbers according to the device serial number, so that a given adapter will always be “COM4” for example. Alternately, some devices assign COM-port numbers according to which USB-socket the adapter is plugged into. In this case moving an adapter from one USB socket to another will cause things to stop working. So a good rule of thumb is to always use the same USB socket for each adapter.

Good luck and good sailing!
Jim Corenman