Author Archives: Jim Corenman

SailMail via Iridium GO! exec

The Iridium “GO! exec” is Iridium’s Certus-100 terminal, a completely different device than the Iridium “GO!”. The original GO! is quite slow (2400 baud), but has an available unlimited data plan which makes it quite attractive from a cost point of view. Access to the original GO! is also restricted to approved apps (including Sailmail), and Airmail includes a special “Iridium GO” device selection to support connections to Sailmail.

The GO! exec is considerably faster (88K baud) but usage is all charged per MB– there are no unlimited* plans (see below). So it is necessary to manage the data connections, otherwise browsers, windows updates, etc will all have a wild party with your credit-card. This is done by setting up a firewall “profile” in the GO! exec for Sailmail (or other services that you want to use), limiting access only to those servers.

Continue reading

Disabling Windows NCSI

Windows “NCSI” is “Network Connectivity Status Indicator”, which monitors network internet connectivity by actively probing the connected networks for internet access. This is a part of Windows networking that attempts to provide a seamless internet experience in a dynamic WiFi environment. As sailors, our WiFi environment is certainly dynamic but also not always well-behaving in convention terms. Offshore, connections are slow and costly, and hopefully firewalled against unwanted use. In particular, the Iridium GO! won’t connect to internet until configured by Airmail or another app. This, in turn, causes NCSI to provide bad advice to Windows networking which can result in disconnections.

Continue reading

Iridium GO! Troubleshooting

Using the Iridium GO! with Sailmail is normally straightforward:

  1. Connect the computer WiFi to the GO!
  2. Open Airmail’s internet-access window
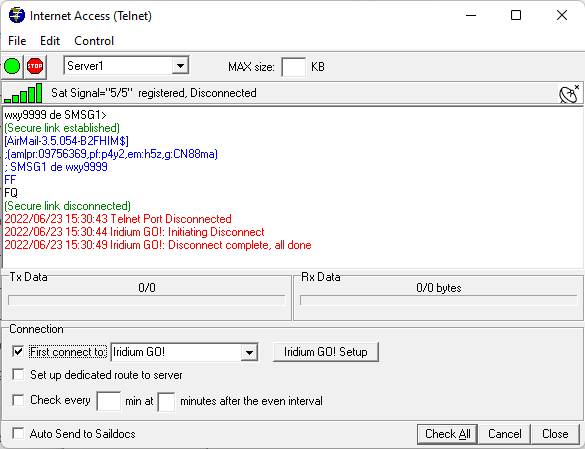
  3. Check the box near the bottom that says “First connect to iridium GO”.
  4. Verify signal strength and click the green button to connect.

But sometimes things go wrong. This article will review the more common issues and explore solutions.

Continue reading

Pac Cup 2022 Special!

SailMail is a terrific option for Iridium GO, handsets, or other satellite systems. Low-speed internet is still low speed, with most of the same issues that we addressed 24 years ago with the launch of Sailmail for the 1998 Pacific Cup. It was free back then, we’re making an offer now that is almost free.

Sailmail offers integrated email and weather from our Saildocs server, compression and secure connections, as well as position reporting to friends and family. Sailmail is a certified app for the iridium GO, and our Airmail software can automatically connect hourly or whatever and collect weather while you sail the boat. For both the GO and Iridium handsets, we protect your airtime against software updates mid-ocean. For incoming mail, we filter large attachments, malicious emails, and spam.

A great side benefit of being a SailMail member is access to our GFS global weather archives, going back to 2004. Just browse past weather or challenge your favorite routing software, we’ve got the data.

We are offering PacCup racers special membership pricing for this year’s race. Join now for only $59 and use SailMail through August 31, 2022. This will get you to Kaneohe (and hopefully back!).

To take advantage of this offer please click here (sailmail.square.site)

And if you are also using HF radio then click here for full membership:

Sail fast, sail smart, and above all, be safe.

Iridium 9555 and 9575/Extreme and Win-10 Drivers

An Iridium 9555 or 9575/Extreme handset connects to the computer via a USB cable, and will need USB drivers to function properly. Iridium offers a driver-installer program, but with a spring 2021 Win-10 update that quit working properly. For recent Win-10 versions, we recommend either using Windows default drivers or installing the Iridium drivers manually as described below.

First, check your Windows-10 version: Open Windows settings, select “System” and then “About”. The Windows version is shown at the bottom. For Windows version 2004 (build 19041.xxxx) or later, use the Windows default install below. For earlier Win-10 versions (ver 1909 or earlier) then use the Iridium Driver-Installer below. Earlier versions of Windows (e.g. Win-7) should use the manual installation below.

Windows default: Updated versions of Windows-10 will install the correct driver for the Iridium handsets. If you open Windows Device manager before connecting the phone, then you can check the install and note the COM-port number (e.g. COM3) for setting up the connection.

Open Windows Device Manager (use Windows Search for that name), find “Ports” and expand that. This will show any serial ports that are plugged in (including the Iridium “USB Serial Port” once configured).  Now connect the phone, and Windows will install it as a “USB serial device” and you will see that appear in the “Ports” list. Note the COM-port number (e.g. COM3).

Also check that the drivers installed correctly: Double-click the “USB Serial Device” in Device Manager (or right-click and select “Properties”), and check for “This device is working properly”. If you see that, and no yellow warning icon, then you are all set, proceed to the Iridium set-up page.

You can also proceed with the manual install below. This will change the device name from the generic “USB Serial Device” to “Iridium 9555A Handset USB Serial Port” (or similar) “. The drivers however are the same, just a different device name.

Manual driver installation: If you see a yellow warning icon in Device Manager, or if the device “Properties” window indicates an error, then manually install the drivers as follows:

A CD-ROM disk that came with a recently purchased phone should have the correct driver files (.inf and .cat files). You can also click here to download them. Open the “zip” file and copy the “Iridium-9555-9575” folder to a “Drivers” folder on your hard drive (C-Drive), create a “Drivers” folder first if needed.

To manually install the Iridium USB drivers, right-click on the “USB serial device” that appeared when the handset was plugged in, and select “Update drivers”. Click “Browse my computer…”, and browse to the “Iridium 9555-9575” folder under Drivers on the C-Drive. (Or the CD drive if using that). Be sure that “Include subfolders” is checked.  Click “Next” and verify that Windows successfully updated the drivers. Windows Device Manager should now show “Iridium 9555A Handset USB Serial Port” (or similar) with the same COM-port number.

If Windows indicates that the “Best drivers are already installed”, or if you still see an error or yellow warning icon, then delete the current drivers as follows and then repeat the manual installation.

To delete the Iridium device drivers, right-click on the USB Serial Port device and select “Uninstall device”. If you see a box for “Delete the driver software for this device”, then check that. Then click “Uninstall”. Next, select Device Manager’s “Action” menu and click “Scan for hardware changes”, or disconnect and reconnect the handset.  Depending on the Windows version, this will install the default Windows USB/serial drivers or you can repeat the manual install, above. Note the Comport-number when Device Manager refreshes, you will need that for the modem setup.

Iridium Driver-Installer: If you have an earlier version of Win-10 (1909 or prior) and are unable to update or prefer not to, then you may need to use Iridium’s Driver-Installer. This only works properly for older Windows versions. There is no harm in trying it, however, and it can be removed as described above. Click here to download a copy, or download it from the official iridium driver page here: https://www.iridium.com/services/data-tools/ 

Troubleshooting:  If you previously installed Iridium drivers using the Iridium driver-installer program then you will see “Iridium Handset USB Serial Port” (or similar) instead of “USB Serial Device”. If it has a yellow warning icon then delete the drivers (see above), otherwise give it a try. It may work depending on your Windows version.

The original Iridium USB drivers (prior to 2016) for the 9555/9575 handsets were not compatible with Windows 10, resulting in a “blue screen” (BSOD) Windows crash whenever the USB port was opened. It took a long time for updated drivers to become available, in the meantime we created a work-around (details below) which is no longer needed. So if you see a warning from Airmail that the “Iridium drivers may not be correct…” you should ignore that. Check the “stop asking” box and click OK.

If you have already done our previous workaround, then there is no need to un-do that. If you installed ver 3.5.041 of our Airmail software and used the driver-checker then again this works fine, but you can re-open  Airmail’s “Check Iridium Driver” (under Tools menu) and click “Reset Driver-Test Mode”.  Also, if you disabled the UEFI “Secure Boot Mode” then you can re-enable that if you want:  From the Windows button click Power, Shift-Restart, Troubleshoot, Advanced Options, UEFI Firmware settings, Restart, “Secure Boot Control”.

The official iridium driver page is here: https://www.iridium.com/services/data-tools/ However, only the driver-installer is listed there. That no longer works properly as of mid-2021 so do the manual install above.

Once the drivers are installed, go back to the Iridium set-up page to finish the setup.

Getting Position-Report Data From Coastal Explorer

Position-report data for Sailmail can be shared from Coastal Explorer, a popular charting program from Rose Point Navigation. Coastal Explorer and our Airmail software can be running on the same computer or connected via a wired or WiFi network. Data can be made available by either creating a UDP port for sending data or a TCP “Data Server” to allow Airmail to connect and retrieve data.

Continue reading

Getting Position-Report Data From Expedition

Position-report data for Sailmail can be obtained from Expedition, a popular program for ocean racing and cruising. Expedition can be running on the same computer, or connected via a wired or WiFi network. Data is shared by creating a new network connection in Expedition to send the data in NMEA-0183 format, and setting up Airmail’s Position Reports module to receive the data. Data can be sent either via TCP or UDP network connections, see below.

Continue reading

Using Airmail’s Mail Client window

When internet access is available, you can use Airmail’s “Mail Client” window to connect to Sailmail to retrieve and send messages over a standard POP3/SMTP email connection. This is not useful for satellite or other low-speed connections, but is an alternative when shore-based internet is available (marina WiFi, cellular hotspot, etc).’

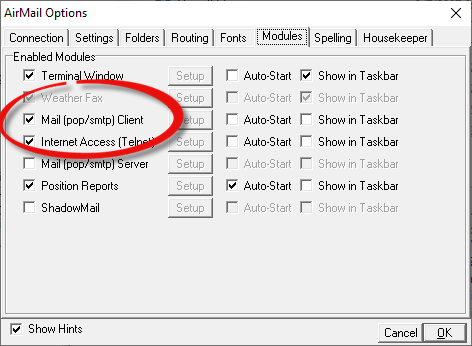
Open Airmail’s Mail Client window from the “Modules” menu. If you don’t see “Mail Client” listed, then open the “Options” window (“wrench” button or from Airmail’s Tools menu), select the “Modules” tab, and then check the box to the left of “Mail (pop/smtp) client”.

Options window showing Mail-Client setting

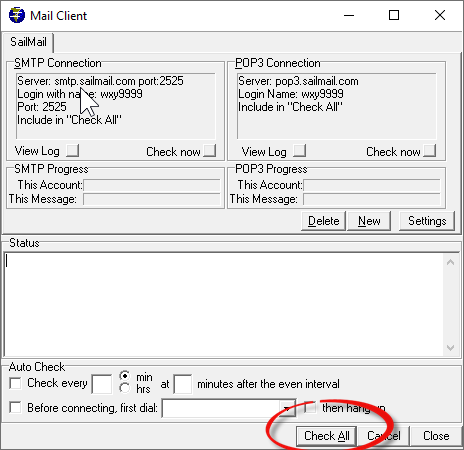
For Airmail 3.5, the Mail Client window will be pre-configured for Sailmail. Simply click the “Check All” button to check each account (“Sailmail” in this case) and send/receive email.

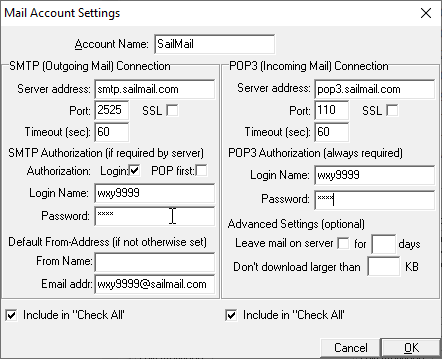
For earlier versions of Airmail you may need to add the settings for Sailmail. If there is a “Sailmail” tab at the top then click “Settings”, if not then click “New” and enter “Sailmail” as the account name. Enter the following settings:

For SMTP (Outgoing Mail (SMTP) Connection:

  • Server address: smtp.sailmail.com
  • Port 2525 (no SSL or TLS, see note below)
  • TImeout: normally 60 seconds
  • Authorization: check “Login”
  • Login Name: Your Sailmail callsign or ID (without the “@sailmail.com”)
  • Password: Your Sailmail Password (from your “Welcome” message)
  • The “Default from-address” will be your complete Sailmail address.

For POP3 (Incoming Mail) Connection:

  • Server address: pop3.sailmail.com
  • Port 110 (no SSL or TLS, see note below)
  • Timeout: normally 60 seconds
  • Login Name and Password, same as above
  • If you want messages to remain available on the server for radio or satellite download then check “Leave mail on server”. If “days” is blank then messages are held for up to 30 days, or until retrieved.
  • If you don’t want to download large messages then enter a limit (KB = 1024 bytes).

These settings will work also for other email clients, e.g. checking from GMail or Outlook accounts, etc. Sailmail now supports SSL/TLS and setup is straightforward.

A note on SSL/TLS: These terms refer to secure connections, SSL (Secure Socket Layer) generally refers to the earlier implementations (SSL 1.0, 2.0, 3.0). TLS (Transport Layer Security) refers to updated versions.

Sailmail’s mail server supports SSL ver 3.0 and TLS 1.0, 1.1 and 1.2. Servers and clients always negotiate the highest level that both sides understand. For SMTP, port 465 was previously SSL and 587 was TLS, but they are now interchangeable and either can be used. POP3 SSL/TLS connections use port 995. Future Airmail versions will show only the TLS option.

Note: SSL/TLS connections can be used with Airmail’s mail-client, for SMTP enter port 465 or 587 and check SSL (or TLS if available). For POP3, enter port 995 and check SSL (or TLS).