Author Archives: Stan Honey

Running AirMail on a Mac

If you have a Mac that uses an Intel processor you can use Parallels or BootCamp to run Windows.  You then run AirMail in the Windows environment on your Mac.  Parallels has the advantage that you don’t have to re-boot to switch operating systems.  See www.parallels.com.  BootCamp also works fine for Mac’s with Intel chips but does require re-booting to change between operating systems.  In both cases you need to have a copy of Windows.

Newer Mac computers that run on the M-series processors (e.g. M1, M2) processors are also supported by Parallels running Windows-ARM (bundled with Parallels) and happily run AirMail, but connecting a USB device requires ARM device drivers– which are not available at this time for the USB versions of the SCS Pactor modems (e.g. PTC-II/IIIusb, DR-7×00). Network-connected modems do not require drivers and should work (but are untested), Bluetooth may work but is also untested.  Older modems with a serial-port interface and a FTDI USB/serial adaptor should work with FTDI’s ARM drivers, other USB/serial adaptors will depend on ARM drivers.

Another approach to running AirMail on a Mac is to use the Mac version of WINE or Crossover. This approach allows running Windows programs without Windows, but again Apple’s switch to the M-series processors has changed things. And setup can be a challenge. For details on how to run AirMail on a Intel-processor Mac using WINE/Crossover see:   http://tritonmarinesystems.com/Media-Sailmail/       Thanks to Stas’ Lewak for this information.

Glossary of SCS Pactor Modem model numbers

SCS model numbers and pactor modes are confusing.   Current modems in production are the PTC-IIIusb and the P4dragon, and are recommended.    Any previous PTC-II, IIe, IIex,  IIpro, or IIusb modem can be licensed to use the Pactor-III  protocol for a fee (paid to an SCS dealer or to SCS, not to SailMail) but can’t be used for P4.   Pactor-III transfers data 3-4x faster than Pactor-II with good signals, and is slightly faster than Pactor-II even with weak signals. P4 is somewhat faster still, particularly with strong signals.  We strongly encourage all members to use at least Pactor-III.  SailMail’s stations are all capable of all modes including Pactor-4.  We expect that PTC-II-family modems (licensed to use Pactor-III) will continue to be used by most SailMail members because of the significantly lower cost. But for those with greater communications needs, Pactor-4 offers a way to increase capacity.  Pactor-III mode was developed after the PTC-II and PTC-IIe were introduced, and was an “option”– part of the newer firmware-updates but had to be “unlocked” with a purchased license-code.  For later modems this Pactor-III license-code was keyed to the modem’s electronic serial# (ESN) and was transferable with the modem. For earlier modems, all PTC-II’s and early production PTC-IIe units, without an ESN, the original policy was for SCS to issue a license code that was keyed to the user’s callsign. This license-codes are not transferable to a new owner and are no longer available.  If you have a PTC-II or early PTC-IIe that does not have an ESN (i.e. no barcode sticker on the bottom), it may be possible to have the modem retrofit with a hardware ESN.  contact Gary at Farallon Electronics to find out.  If it is possible, the ESN retrofit and P3 license will cost around $350.

Leave the modem selection in AirMail set to your modem model number.  If your modem has indeed been upgraded to Pactor-III mode then Airmail will detect that, and use it. Continue reading

Tradeoffs between satellite systems

Satellite Systems, Handsets, and Hotspots

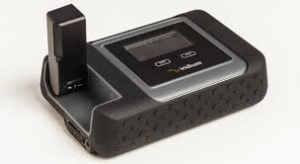
The Iridium GO! has the cheapest data plan. Plans vary so be sure to shop around. Among other

Iridium GO!

Iridium GO!

airtime vendors, check the prices at www.OutfitterSatellite.com     Iridium units and Inmarsat isatphone have different strengths and weaknesses. Iridium’s satellites are in low-earth orbit (LEO’s) and are relatively close, meaning strong signals and an easier connection from you to the satellite. Being in low orbit they move quickly relative to the earth and sometimes data calls are dropped. Inmarsat uses geostationary satellites, which will always be in the same location in the sky, but are much farther away which means weaker signals and slower speeds but fewer dropped data calls.  Globalstar uses low satellites but only works when a satellite is in simultaneous view of both the vessel and a shore station.  This limits Globalstar’s coverage to within a few hundred miles of shore, in spite of the name.

In any case, a proper external marine antenna is important, located where it has a clear view of as much sky as possible.

There are three choices for Iridium products, the GO!, the 9555 and the 9575 “Extreme” ruggedized phone. The GO! has the cheapest data plans but is fiddly to use for phone calls

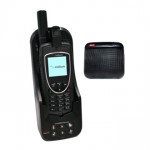
Iridium Extreme in a dock

Iridium Extreme in a dock

because it requires the additional use of an iPhone connected via wireless.  The Iridium 9575 Extreme is handier in an emergency. The Extreme can be used by itself to make phone calls and is water resistant.  Both the Iridium Extreme and the GO! contain GPS and GEOS emergency button. So if your Extreme or GO! is registered with GEOS (free), you can press the red button, and folks on your registration list, as well as SAR authorities, will be forwarded your location and your request for help.

Most folks go with Iridium over Inmarsat and Globalstar, and most folks select the Iridium GO! unless they want a device to also be handy to make calls in an emergency, in which case they buy an Iridium Extreme and pay higher data rates.

Data communications costs about $60 per megabyte over Iridium, unless you pay $125 per month for the unlimited data plan on the Iridium GO!.

Wide Bandwidth Satellite Dome Systems

Inmarsat FB150

Inmarsat FB150

The Inmarsat Fleet Broadband 150 is a 13 inch dome that provides 150kbps data at $25 per megabyte, with nearly worldwide coverage.  Inmarsat also has a “Fleet One” version of this system but it isn’t useful due to its limited coastal coverage.

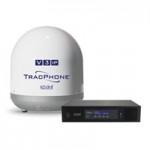
The KVH V3 is a 14.5 inch  dome that provides 300kbps data at $1 per

megabyte with coverage of any place that a sensible cruiser is likely to go.

KVH V3

KVH V3

Webmail. Accessing your SailMail account via somebody else’s computer.

If you have to use somebody else’s computer or use a public computer in an internet cafe, and you would like to read  the SailMail messages that you have queued for you at SailMail via the Web, you can do so via SailMail’s Webmail service.   Note that you can delete  email messages via these Web based mail readers.  This will avoid you having to waste radio connect-time downloading old messages when you access the SailMail system via radio from your boat.

If you have been away from your boat for a while, it is a very good idea to access your account and delete all of the old messages.

SailMail via Iridium Handsets

While the Iridium GO! provides somewhat cheaper cost for transferring data, Iridium handsets can also be used to transfer data. Handsets also have an advantage in that they self-contained for voice calls in an emergency.  The Iridium Extreme phone is water-resistant, incorporates a GPS, and has an “SOS” button that allows it to be used to summon help, as does the GO!.  Some cruisers buy a “dock” like the one in the photo below from Beam.  When in the dock the Extreme phone is connected to the external antenna, power, and to the computer/USB, and is kept charged.  It can be quickly removed for manual use.  Note that the Iridium GO! and Iridium handsets transfer data at about the same speed, but the Iridium GO! has cheaper data rates and connects more quickly.
DriveDOCKExtreme_medIridium offers a “PPP Data Service” for their handsets, which is simpler and quicker than using the Iridium “Direct Internet Service” or a “Dialup” connection.  This is a direct-to-internet connection through the Iridium internet gateway. The advantages are simplicity (no fancy compression or proxy-servers), no other internet service provider required, and faster setup. This service is perfect for checking mail with SailMail’s direct internet access (aka “Telnet”). This document describes how to set up an Iridium PPP connection.


Drivers: USB drivers are needed for the Iridium 9555/9575 handsets, see this page for more info.

Also be aware that Windows-10 has been reported to “update” Iridium drivers with drivers that don’t work. If you encounter that, re-install the correct drivers.

Prior to using your Iridium phone for a PPP internet connection for the first time, you need to set up a “Standard 19200 bps” modem driver on your computer, and then set up a dial-up networking connection for the Iridium-PPP service.  These steps are both described in detail below for Windows 7, 8 and 10:


First step: Install a Modem-Driver:

1. Close all applications (at least any that use the internet).
2. Open Windows Control Panel (Windows search box is your friend here).
3. Set “View by” to large or small icons, then double-click on “Phone and Modem Options”.
4. Select the “Modems” tab and click “Add”…
5. Check “Don’t detect my modem; I will select it from a list” and then click “Next”.
6. Select “Standard Modem Types”, then “Standard 19200 bps Modem” and then click “Next”.
7. Click the “Selected ports” button and highlight the COM Port that you will use with the Iridium phone (e.g., COM3). Click Next, then Finish.
8. Now go back to Control Panel, open “Device Manager”, find “Modems” and expand that, and find the “Standard 19200 bps Modem” that you just created. Double-click that to open “Properties”, and select the “Advanced” tab.
9. In the “Extra initialization commands” box, enter: AT+CBST=71,0,1
10. Double-check that, then click OK, then close Device Manager.

(Note: You can see the modem properties box via “Phone and Modems”, but the “Extra initialization commands” box is disabled. Go through Device Manager instead).

Second step: Configure a Dial-Up Networking connection

1. Open Windows Control Panel and select “Network and Sharing Center”.
2. Click “Set up a new connection or network” and then click Next.
3. Select “Connect to the Internet” and click Next.
4. If you see “You are already connected to the internet”, click on “Set up a new connection anyway”.
5. If you see “No, Create a new connection” select that, unless you are checking settings of an existing connection.
6. Click on “Dial-up”, and (if prompted) select “Standard 19200 bps Modem”.
7. In the “Dial-up phone number” box enter 008816000025 (see “Note” below)
For User name and Password enter “none” (type that in, without the quotes),
Check the “remember password” box.
For “Connection Name” enter “IridiumPPP”
8. Then click “Connect”, Windows will try to connect– click “Skip” to continue.
9. Click Close and return to Network Center.
10. Click “Change Adapter Settings” on the left, find “IridiumPPP” and right-click and select “Properties”. (Or, open the connection and then click the “Properties” button).
11. On the first tab make sure “Use dialing rules” is not checked, and click “Configure”
12. Then click “Configure”, and check all three hardware features, then click OK.
13. On the “Networking” tab, un-check all items except “Internet Protocol Version 4 (TCP/IPv4)”. (If any items won’t un-check, that is OK).
14. Click OK to close.

NOTE:  Telstra customers should use the Telstra data number “66666”. The “0088…” number will also work but may be charged at a higher rate.

To connect manually, click on the Networks icon in the system-tray (lower-right corner of the screen), select “IridiumPPP” and select “Connect”. Repeat to disconnect. You can also get to the connections properties from this window.

The following details are important:

1. Don’t forget the “Extra initialization string” in the first section, this is critical.
2. Under Network Connections (second step), only “TCP/IP” should be checked.
3. You need the COM-port number associated with the phone. (The 9555 phone installs as a COM port, use the driver CD supplied with the phone).
4. You must be logged into Windows with Administrator privileges.

Once all that is done, open Airmail’s “Telnet” window (click the “Internet” button on the toolbar or open the Modules menu then Telnet-client). Check the “dial first” box in the Telnet window, and select the “Iridium PPP” connection, and make sure that the “hang up” box is also checked. In recent versions of Airmail the Telnet-window is already set up, just select “Server1”. Also be sure to select “Set up dedicated route”, this will block other programs from trying to “hijack” your Iridium connection.

To check mail, click Airmail’s “Internet” button (or go to Modules menu, Telnet-client), make sure “Server1” is selected, and click the green “connect” button. Airmail will dial the phone, contact the server, and exchange mail. Watch the connection and make sure it disconnects when finished. (in the rare case that the primary server is unavailable, there are also two backup servers available).

Troubleshooting:

Remember that the Iridium antenna must be outdoors, with a clear view of the sky. The best antenna is a proper fixed-mount Iridium marine antenna, they are not cheap but are strongly recommended if you are serious about it working reliably. The next-best is the small “hockey-puck” car-style antenna, IF it is stuck to a piece of metal (e.g. a car, or a metal pie-tin 8″/20cm or larger). It is meant to work on a car roof, and needs the metal ground-plane. The phone’s antenna also works (as a third choice), IF it is above-decks with a clear view and oriented vertically.

Also, remember that Iridium connections (voice or data) are relayed from satellite-to-satellite to reach an earth station. Your phone shows the signal strength to the first satellite only. If the next satellite is too far, or congested, then the connection can stall or be dropped.

  • If the phone doesn’t connect at all, check the signal and then check the modem and connection settings above. Also verify that the phone display shows “Data call”.
  • If the phone connects but you cannot connect to SailMail then check the Telnet settings below. You must be using port-50.
  • If you do not have an Internet/Telnet window at all then go to Airmail’s Tools menu, Options window, Modules tab, and check the box to the left of “Telnet Client”. Click OK.

To check your Telnet settings first open the Telnet window (click the “Internet” button or go to Airmail’s Modules menu and select Internet or Telnet Client). Make sure “SailMail” is selected if you have also configured Airmail for ham use. Select “Server1” and click “Settings”. (From Airmail 3.5 these settings are part of the system settings, click Edit menu, then Settings. For earlier Airmail versions the settings may need to be entered manually).

Here are the correct settings (from mid-2020):
remote callsign: Server1 (or SMSG1)
remote host: 18.208.67.17 (see * note)
Port: 50
TImeout: (blank)
Local callsign: (your SailMail callsign/ID, see ** note)
Password: (your SailMail internet password, Case-Sensitive!).
Click OK to save settings.

* Note: Using the numeric IP address is strongly recommended, it saves airtime and is more secure. But remember that this address may change if we need to shift servers– so if you cannot connect then enter “server1.sailmail.com” and note the address which is shown when you connect. (Don’t include the quotes shown here). A second server is server2.sailmail.com with the address 44.232.19.175 both using port 50.

** Note: For Airmail 3.5 and later your Callsign/ID and password are entered in the Options window (Tools menu), Settings tab, on the left side under the small “Sailmail” tab).

And finally, if you want to initiate a PPP Data call manually for testing, click on Window’s Networking icon in the lower-right and select the “Iridium PPP” connection and click “Connect”. But don’t forget to disconnect when you are finished!

Cheers, Jim
support@sailmail.com
(revised 2021-06-14)

Recommended Operating Practices

LISTEN FIRST.  Before you transmit, be sure to listen carefully to be sure that there is no traffic in progress.  Sometimes the chirps  or periodic rasping sounds only come at 4 second intervals, so listen for a while.   If there is traffic on frequency, you will not be able to connect, and your attempts will just delay the traffic that is already underway for the duration (1 minute) of your call.     If you hear “chirping” or a periodic “rasping” on a SailMail frequency then the station is in use; DO NOT TRY TO CONNECT.

Keep in mind that the SailMail stations (with certain exceptions such as KZN508, VBV2222, OSY, and VZX) have just one transceiver that scans the frequencies looking for a call.  These stations therefore can only handle one connection at a time.  Many members find it convenient to tune around and listen on all of the frequencies assigned to the station that they want to connect to, to see if the station is busy.  If they hear that a station that has just a single radio is busy on a frequency, it is fruitless to call that station on another frequency (it doesn’t cause interference, it is just pointless).  Instead,  wait until the station is available, and then call on whichever frequency that you figure will work best.  If a station is busy, consider trying another station.  If you connect in the late afternoon or evening at a high frequency, you can connect to stations that are quite far away.

If you tune around and do not hear somebody else using aa single-radio station, go ahead and try to connect.  If the station does not respond it is either because the station is busy on a frequency that you cannot hear because there is no propagation to you at that frequency, or it could be because there is no propagation at the frequency on which you are calling.  If you are trying to connect to a multiple-radio station, just listen to make sure that your frequency is not in use, and then try to connect.

Not listening first, or attempting to connect to SailMail on a frequency that is already in use, is counter-productive, lubberly, pointless, rude, un-shipmatey, and violates International Telecommunications Law (as well as common sense).  We are open to creative suggestions for ways of further clarifying this point.

It is ok to call on a frequency where a station is just finishing a connection.  Be aware, however, that just because you hear the station identify itself in Morse code, the connection may still be in progress.  The stations transmit their identification in Morse code itself every 7 minutes DURING a connection as well as at the end of the connection.  If you call on a busy frequency, when another member is connected to the station, you will not be able to connect and your attempt may delay the traffic that is already underway.  Your fellow SailMail members will be able to identify who you are, and you will be known forevermore as a heel and a lubber.  Net, DO NOT call when the station is busy, and DO NOT reflexively call when you hear a Morse ID.  Instead, wait to make sure that it is the end of your fellow member’s connection before you call.

If you are connected to a SailMail station and some thoughtless heel tries to connect during your connection, do not disconnect.  Let your connection continue.  If you are using Pactor-III or Pactor-4 your connection will typically not be interrupted.

Be careful when you address your messages, and double-check the internet email addresses (including the “cc:” addresses) before sending.  In some cases you may not receive a “bounce” message in response to an incorrectly addressed outgoing email; the message will be delivered to a stranger.  Don’t guess at friends’ email addresses.  Instead, send an email to a mutual friend and ask for the correct email address.

Fully charge your batteries JUST PRIOR to using SailMail.  Marine SSB’s are intolerant of even slightly low battery voltages, particularly when sending data.   By trying to connect to the SailMail station with anything other than batteries that are fully charged, you are wasting your own time and batteries, as well as using more station time than is necessary.  You will occasionally hear vessels whose signals sound garbled or distorted (unsuccessfully) calling the SailMail station.  This garbled sound is generally caused by calling with batteries that are not fully charged, but can also be caused by RF getting into the Pactor-modem/radio wires or by over-driving the radio.

The system automatically computes a running average of your connect time over the last 7 days.  Limit your usage to a running average of 90 minutes per week.

Carefully control access to your SailMail email address.  Give it only to responsible friends and family members.  NEVER post your SailMail address on a website.  If your SailMail address does get posted on a website, it will get “harvested” by the “trawling” programs that spammers use to find email addresses from the web, and you will start to receive spam messages within a day or so.

Instruct your correspondents not to forward to you Internet jokes and frivolous emails.  Ask them to refrain from putting your SailMail address on chain-emails, jokes, postings to Internet news-groups, websites, or widely cc’d emails that will attract SPAM to your SailMail address.  If your SailMail address ends up on SPAM mailing lists, your SailMail account will become useless because it will become too time consuming for you to download all of the SPAM in order to get to the few messages that you really want to receive from close friends and family.  If you maintain a website with your cruising newsletters, do not allow your SailMail email address to be visible on the website.  If it is, it will end up on SPAM mailing lists.  Before you joined the SailMail Association, there was never a single SPAM email sent to your SailMail address, and the SailMail Association never releases any member’s email address to anyone.  If SPAM starts, it is because of something that you or one of your correspondents has done.  If one of your correspondents does err, and your SailMail account does end up on the SPAM lists, contact sysop@sailmail.com and we can change your SailMail email address.  This will require you to inform your (desirable) correspondents of the new address.   It is far preferable, however, to avoid the problem in the first place.

If you want to distribute email newsletters to multiple email addresses, use SailMail’s relay service.   This is a far better approach than putting many cc’s on an email which will often cause your email to be rejected as SPAM.

Keep a regular internet email account, and use it as your primary email address for all but your closest friends and family.  Use this regular account for long or non-time-critical messages and for using as a return address when ordering items via the Internet.  If you want to post an email address on a website, use this (non-SailMail) address..  You can check this address from time to time when you have regular access to the internet.    You can also check messages on this regular internet email account via the SailDoc’s Shadowmail service.

Under NO circumstances should you set up your regular email account to automatically forward messages to your SailMail account.  If you start to receive lots of unwanted messages, your SailMail account will become saturated and you will not be able to use SailMail to send and receive the messages that you really care about.

Inform your correspondents that the Internet, HF communications, and electronics on sailboats, are not perfectly reliable, and so if they stop hearing from you during a passage they should not panic and they should not call the Coast Guard or other authorities.  If the Coast Guard calls them, however, inquiring about your whereabouts and why your (registered 406) EPIRB is going off, THEN they can panic.

When you are in a major marina use  internet access via your boat computer, or use “Webmail” via a public computer  to retrieve your SailMail messages at an Internet Cafe or other location where you can get access to the Internet.  When your vessel is in a marina your SSB will work poorly due to the presence of nearby masts and rigging, and due to the electrical noise of the adjacent city and vessels.  If you are able to connect to the SailMail station at all, your traffic will be transferred slowly due to the rotten signals, and your SailMail transmissions will interfere with other vessels in the marina as they monitor voice SSB weather and nets.

If you are in a marina or harbor with  nearby vessels, and MUST use SailMail, be certain to avoid the times of the marine and ham cruisers’ nets to avoid causing interference with them.  You can also dramatically reduce the interfering “splatter” caused by your SSB if you make sure that your batteries are FULLY charged when using SailMail, and if you reduce the transmit power of your SSB somewhat.    You will find that reducing your transmit power will have little effect on your transfer times; indeed many hams routinely run at 25 or 50 watts transmit power when using Pactor.  A reduction in transmit power, in conjunction with using fully charged batteries, will dramatically reduce the interference that you cause to  nearby vessels.

Do not sign up (via your SailMail address) to services that routinely send you email messages (stock quotes, Yotreps, weather).  If you sign up to one of these services, and then travel ashore for a while or are otherwise unable to download your messages, your SailMail account will become useless because there will be so many messages queued on the station for you that you will not be able to get to the messages that you are really interested in.  Similarly, do not sign up (via your SailMail address) to subscription news services or other “broadcast” internet email services.  There are other communications technologies that are better suited to receiving general news; for example get your news by listening to the BBC.  SailMail station time is best used for personal email communications for which there are few inexpensive alternatives for non-hams.  It is OK, however, to subscribe to weather via the Saildocs service.  That service, in conjunction with SailMail’s servers, is smart enough to expire out of date messages to you so that you will only receive the latest Saildocs weather forecast even if you don’t connect to SailMail for several days.


Addressing and Sending Messages

To Send a Message:

In the Message Index Window click the “Format a New Message” Button.
You will see the Address Book, if there is no entry for your recipient, click “New” and then fill out the form, setting “Email Gate” to EMAIL, and “Post Via” to SAILMAIL. Click OK.
In your message, make sure that “Email Gate” is set to EMAIL. and “Post Via” is set to SAILMAIL.  (NEXUS also works ok for “Email Gate”.)
Put only one internet address on the To: line (replacing any template chatter).
You can put multiple internet addresses on the cc: line, with each address separated by a COMMA.
Type your message into the window below the subject line.
To post the message, click the Post Box button (Post the current message).
To send the message, go to the Terminal Window (press the blue globe button), check that the “handshake” button is pushed in,  LISTEN, and if the frequency is clear, click the green button.
Remember that all internet addresses contain exactly one “@” sign, contain no spaces, and have at least one “.” to the right of the @ sign.  Carefully check your To: and CC: addresses.

Messages sent from the internet to your boat should be addressed:
CALLSIGN@sailmail.com
Where CALLSIGN  is your boat’s marine callsign which should look something like WXY1234
Encourage your correspondents to carefully address their email to you.  If they send email to your SailMail address and they incorrectly type your callsign, they may not receive a “bounce” message, depending on their typo.


Connecting via SSB

With AirMail open, go to the terminal window by pressing the button with the blue globe in it.     Check that your “clarifier” on your SSB is centered.  Check all of the frequencies by scrolling through the stations and frequencies in the pull down menus.  Your radio should be remotely tuned by the PC/modem to a frequency that is 1.5 kHz below the frequency that you select via AirMail, if you hear a periodic “chip, chirp” or a periodic “rasping” sound at 2-4 second intervals, that’s somebody else using that station.    Listen carefully, and when the station is idle then click the left-most green button (from the Terminal Window).  The HF modem will call for about a minute before timing out, that is usually plenty if the propagation is good and the station is not busy on another frequency. If there is no answer then try another frequency or try some other time – it may be busy on a another frequency or there may be no propagation.  While calling, if your radio is not clicking to transmit mode at 2-4 second intervals, then your Pactor-modem and radio are not talking to one another.  Check the cable from your Pactor-modem to your radio.

If your radio is clicking between transmit and receive when calling, check that your radio is drawing an additional 10-15 amps from your 12 volt system when it is transmitting.   If the radio isn’t drawing an additional 10-15 amps when transmitting, then your modulation levels are not set correctly or your tuner/antenna/ground system is faulty and your radio can’t transmit at a reasonable power level because the tuner is unable to provide a good “match” to your radio.

When you get connected you will see the welcome message. If things are working correctly then your computer will respond with your callsign and exchange any email that is ready to go in either direction, and then disconnect. If you got this far, then all of the technical stuff is working, the wires are all hooked right and you figured out the frequencies correctly, congratulations.

If the Pactor-modem is not working properly, your problem is likely either with communications between your laptop and Pactor-modem, or with the connection and configuration between the Pactor-modem and your radio.    If the Pactor-modem did not initialize properly when you opened the Terminal Window in AirMail (i.e. its lights flashed etc), then the Pactor-modem may be configured in a way that is incompatible with AirMail, or your com port may not set up correctly.

If the Pactor-modem IS responding to commands from the computer,  but the radio isn’t responding and transmitting when you try to connect, then your radio interface is probably the problem.  If you cannot fix the problem by carefully reading these instructions, or comparing notes with another SailMail user with a similar configuration, then you should track down a marine radio dealer and pay for some professional help.

If the modem is responding to the computer, and radio is switching between transmit and receive, check that your radio is drawing 10-15 amps more on transmit than on receive when calling on SailMail.  If it doesn’t, try your radio on voice.  If you give a brief whistle into the mic when using your radio on voice (on a clear channel after identifying yourself and announcing that you are testing), your radio should draw 15-20 amps from your 12 volt electrical system.  If it doesn’t you likely have a tuner/ground/antenna connection problem.  If the radio draws 15-20 amps when you whistle into the mic, but doesn’t draw 10-15 amps when transmitting via Sailmail, then you likely have a connection problem to the modem, or your modulation levels are set incorrectly.

If you got this far then try composing a couple of test messages. Do this by going back to the main window (F6 to switch or close the Terminal Window by clicking the “X” in the upper right corner) and click the “Format a New Message” button (all the buttons have “hints” if you pause the cursor over the button for a moment). For the first, choose “sysop” from the address book and click “OK.”  In the To: field should be “sysop@sailmail.com “.  In the Subject: line type “first test message.”.   The lines below the subject make up the body of the message. Send a message to SailMail sysop saying that you figured it out and can now send and receive messages via SailMail.   Click “Post Via” if necessary to set the adjacent box to SAILMAIL.  (If a “dialog box” appears, check the box to “always use this path for Email.”)  Finally, click the “post the current message” button  to post the message for sending (the button looks like a postbox). That will save the message and mark it for sending, and return you to the index.  Your new message should be in the index with a “postbox” icon next to it indicating that it is posted waiting to be sent.

Now go back to the Terminal Window (F6 or globe button).  Check that the  the clarifier is set to center.   Listen, and if the frequency is clear, reconnect to the station as before, and this time your messages should be uploaded to the SailMail station.  SailMail will disconnect automatically when done.

If all that works then your HF modem is wired right and your transceiver is working.


Installing and Setting-Up the AirMail Software

The download version of AirMail is packaged as a self- extracting “Zip” file,  which is available by following the links from the Download Page on this website.  If you already have a previous version of AirMail installed, when you run the download file it will upgrade your previous version of AirMail, and will preserve your settings and address book.

To uninstall AirMail, simply delete the files and folders under the C:\Program Files\AirMail folder.

Start AirMail and answer the initial questions, providing your marine callsign which should look something like “WXY1234”.

Once the AirMail software in installed, if your computer has access to the internet, you can go ahead and try connecting to SailMail via the internet.  In the Message Index Window, click the “Internet” button, which looks like a lightning bolt.  Then click the “connect” button, which looks like a green ball.  You system will send and receive any messages just as if you were connected via radio.

Next do the rest of the radio-related installation…

Before doing anything else, go to Tools/Options on the menu and check the settings. Most of the settings described below should be preset for you in the initial settings of AirMail, but you will need to at least enter your Pactor-modem type.

On the connection page in the Modem Connection section, select the appropriate Modem type and make sure that the Comm Port is correct. In the Radio Connection section select the appropriate option for the remote control of your radio. In the Audio Tones section the Center Frequency should be “1500” and a dot should be next to USB.  Use the radio  in USB/J3E (normal voice SSB) mode.  Leave the Amplitudes set to their default for now.   If you are not sure what you are doing, or how your radio should be set up and connected for remote control, then get help from your marine radio dealer (and pay him or her for the time).   Leave the settings under the Advanced button as they are.

On the settings page you should see your marine callsign under the SailMail tab.   Enter your SailMail Password in the “System Password” box.  SailMail Passwords ARE case sensitive, so enter it carefully.   Leave the settings under the Advanced button as they are.

Don’t make any changes to the folders page or routing page.  AirMail will create a set of message folders when it starts, for incoming and outgoing messages, and a “saved” folder.  It is recommended to use the defaults.

Click the OK button (not cancel) to close the Options Window and save the settings.

Now open the Terminal Window (click the right-most “Terminal Window” button which looks like a blue globe). Watch the upper screen – after 2-3 seconds it should show a list of setup commands in red – these are the “Link Messages” that you elected to show in the Tools/Options/Connection Window.  If all that worked then you should be ready to connect.   If that didn’t work, your laptop and Pactor-modem are not talking to one another and you need to re-initialize your Pactor-modem, fix your cable, and/or sort out your COM port, BEFORE proceed with these instructions.

In the Terminal Window in AirMail, you will notice two or three pull down menu’s, the third from the right (if you have it) should remain set to SAILMAIL and the second from the right should be set to  the SailMail station that you want to connect to.   The right window selects the frequency.

Assuming that you have connected your radio for remote-control, the frequency selection in the right menu will adjust the frequency on your radio.

Equipment choice and installation for Accessing SailMail’s Radio Network

Three components are needed to use SailMail’s worldwide network of SSB-Pactor radio stations: a marine SSB transceiver (with tuner, antenna, and grounding system), a Pactor-modem, and a computer with the appropriate software. The Pactor-modem is the only specialized piece of equipment, and is essentially a specialized modem designed for radio communications. The Pactor-modem generates the audio signals that are sent via the radio transmitter, and decodes the incoming audio signals from the radio receiver. The primary connections between the Pactor-modem and the radio are audio in/out signals, a PTT (push-to-talk) signal to tell the radio when to transmit, and a remote control wire to allow your PC to tune the radio via the modem.

Transceivers

Transmitting and receiving digital signals is similar to voice, and most modern marine SSB radios will do the job.

The second issue is the transmitter’s ability to transmit a continuous full-power signal without damage.  Some recent transceivers can do this without a problem (e.g. Icom M710, M700-Pro, M802), but many older transmitters will have to be operated at a reduced power setting.  If you are buying a SSB and intend to use SailMail, choose a radio that can transmit data at full power like the Icom M802.

The Pactor-modem:

SailMail works best with the SCS Pactor-IIIusb or P4dragon modems.

SailMail also works with the older SCS PTC-II, IIe, IIex,  IIpro, or IIusb modems, but if you buy an older modem make sure that it is licensed to use the Pactor-III mode, and make sure that your computer can can set your SSB frequency, which requires special cables for the modem, or an extra USB adapter for the IIex modem.    We strongly encourage all members to use Pactor-III mode.  We support Pactor-4 at all stations but expect that Pactor III mode will continue to be used by most SailMail members because of the significantly lower cost of the modem. But for those with greater communications needs, Pactor-4 offers a good way to increase capacity.

The Computer:

Any computer running Windows (XP to Win-11) will do the job. Members with Apple computers (with Intel processors) have successfully used SailMail and the AirMail software by using Parallels, Bootcamp, or Virtual PC, depending on their preference and age of their Mac.  See the application note on Mac computers here.  Most recent Windows computers and Apple computers do not have a 9-pin serial ports, and so will require a USB-Serial converter for the earlier serial-port modems.

Other Requirements:

Besides a HF modem, radio, and computer, your on-board station will require a reliable source of 12-volt power and a good antenna. A marine SSB transmitter draws around 20 amps when transmitting at full power, and sending email requires a lot of full-power transmitting.  A full page of text is about 2000 characters which takes less than a minute using Pactor-III on a good day and somewhat less using a P4dragon  in good conditions.  Not a big number in terms of amp-hours, but if your batteries or wiring aren’t up to the task then you will have problems that may be very hard to identify.  Additionally, be sure that your batteries are fully charged PRIOR to using the SailMail system; marine SSB’s are very intolerant of low voltages, particularly when sending data.

Antenna and ground:

Antenna installation is another important topic and a good ground system is absolutely critical.   The most important aspect of a radio installation is the ground connection to the antenna tuner; this is the worst place to cut corners. The standard antenna arrangement for a sloop is to use an insulated backstay driven by an automatic tuner.  The antenna tuner is typically mounted under the deck near the backstay, and is grounded to the keel with a 3″ copper strap.  Additional 3 inch wide copper straps should also connect to nearby metal, such as stern pulpit, metal tanks, and the engine. Keep electrolysis in mind, and remember that radio ground tapes from antenna tuners can incorporate series capacitors that will block any DC electrolytic or galvanic currents.  See the West Marine Advisor article on grounds.  There is a copy of that article attached as an application note to this website.

Common mistakes are using a ground wire instead of a strap,  a ground system that doesn’t connect to enough metal, or an antenna lead wire that is run right alongside a backstay below the backstay insulator. The latter problem is very common and shunts a large part of your signal to the ocean, so put the lower antenna insulator at the extreme lower end of the backstay right above your turnbuckle or backstay adjustor.  Then use plastic tubing to insulate the lower part of the backstay (above the insulator) that is within the crew’s reach.  Radio waves propagate just fine through the plastic tubing, but the plastic tubing will protect your crew just as well as the insulation on the feed wire would have.  The fact that you don’t have the feed wire running near a grounded backstay will dramatically improve your radio’s efficiency.

Some folks ask if there is any magic length for a backstay antenna.  The answer is “yes and no.”  In general longer is better, and unnecessary wire or rod terminations are bad, so often the best approach is to have the top insulator right at the masthead, and the bottom insulator right at the top of the turnbuckle or hydraulic backstay adjuster.  This eliminates four wire terminations (which are potential failure points for your rig) and gives you the longest antenna.  There is a wrinkle (as always).  Base loaded vertical antennas are hard to efficiently load if their length is an even multiple of 1/4 wavelength (e.g. 1/2 wave, or 1 wave, or 3/2 wave …).  Therefore if you are also a ham, and 14.313 MHz is really important to you, avoid those lengths.  A 1/4 wavelength in feet is 234/(freq in MHz), so a 1/4 wavelength at 14.313 MHz is 16.35 ft.  Therefore, if you are a ham, avoid having a backstay antenna that is 32.7 feet or 65.4 feet long.  If you are not a ham and just use SailMail, then just go with the “longer is better”, and “fewer swedge fittings are better” principles and put your insulators at the top and bottom of your backstay and avoid four terminations.  There are enough SailMail frequencies so that if your tuner has trouble tuning your backstay at some frequency because you happened to end up at exactly 1/2 wavelength, there will be other SailMail frequencies on which it will work fine.  Remember when working out the length of your backstay antenna, you start measuring right at the tuner, and you include the length of the feed wire that connects to the backstay in your measurement.

Having read all of the above paragraph, remember that the most important part of your antenna installation is the ground connection to the tuner.  That is the best place to invest your energy to have a SSB that works great.

If you don’t have a backstay, then a 20+ foot marine whip antenna will work fine, again with an automatic tuner and a great ground on the antenna tuner.

The GAM antenna and KISS-SSB counterpoise are very convenient and do work, but using either or both of them will increase the amount of RF radiation inside your boat.  The GAM antenna couples RF energy to your entire rig, not just the backstay.  The KISS-SSB counterpoise radiates RF inside your boat.  If you use either of these then plan on the increased need for ferrites to keep the RF out of your laptop, modem, and other sensitive electronics such as your autopilot and wind instruments.